Showing posts with label distressed furniture. Show all posts

Wednesday, November 15, 2017

Stylish Oak Table

oak side table, painted furniture, restoring oak finish, furniture makeoverI love these oak side tables - so practical in many spaces. 

I already have three of them so this one was destined for the booth.


Bought from Olive, it was painted with a matte black top and the bottom left in the original oak.


The wood was dry and dull.

But the table was in relatively good condition.

No wobbles.


If you have had experience with this style, you know wobbles are a problem.


The solid matte black top was doing nothing for me.


After a sanding to lightly distress it, I began to wax it.


Used Howard's dark oak wax.


After two coats of wax I am loving the top.

A soft sheen and some distressed edges.


As for the dry wood Howard's Restor-A-Finish to the rescue.

Used oak finish.

See the difference from the front leg to the back leg.

It transforms the wood in minutes.


The stylish black-top, oak side table is ready to go.

And I am off to complete more projects.


I do not receive compensation from Howard's.


See y'all!


Follow Me on Pinterest

Thursday, October 26, 2017

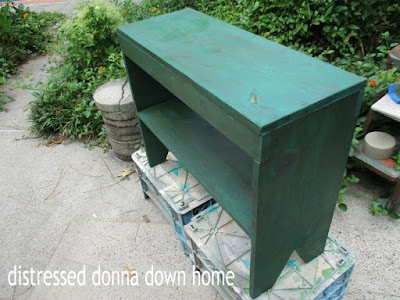
A Green Bench

furniture makeover, Howard's Citrus Shield wax, FolkArt paint, bench,  Primitive
The bench was supposed to be the perfect bench for the new laundry room.


However once the washer and dryer were installed, it was three inches too long.

Really!?!


Had the bench fit perfectly like I had carefully planned, it would have been left in this distressed state and waxed.

Look at all the storage underneath.


Made a color wash of my favorite color of FolkArt craft paint.

Half paint.

Half water.

Brushed it on quite generously.


Turned out w-a-a-a-a-y too bright for me.


Used Howard's Dark Oak wax to tone it down.

I quite like this bench.

Too bad it does not fit anywhere I would want it.

Off to the booth.


See y'all!


Follow Me on Pinterest

Tuesday, October 17, 2017

Blue Top Tables

table makeover, painted furniture, vintage tables, Howard's Restor-A-Finish
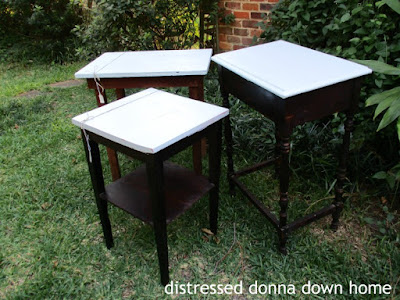
I will swear these three tables have blue tops.

I used a pale blue.

The three tables are part of downsizing.


This table was a standard in the bedroom corner.

Came out at Christmas to display a manger.

Have to remember it is no longer available.


This table was a standard in the den.

Held seasonal displays including a small Christmas tree.

Have to remember it is no longer available.


Under the burlap a pot-burnt surface.

Yes, that is a mahogany table.

Yes, I have sworn countless times NOT to paint any more mahogany furniture pieces.


This table was a standard in the breakfast room - formerly part of Horror Monster, my once-beloved craft stash.

Held metal file boxes of paper supplies and craft books.


I have to remember ...

No, I don't have to remember because ALL the craft stuff is GONE!


Peeled off several layers of adhesive paper to discover a whole lot of ugly.

Decided to wash and scrub.

 Multiple times!


Somewhat better.


Sanded the tops of all three.

Scrubbing the bases several times.


All the tops now smooth as glass.

All the bases were treated with Howard's Restor-A-Finish. (Not a sponsor)


Right cute little group.

Great little work tables, but they never made it back in the house.

Straight to the truck for a ride to the booth.


I waited until dusk to prove the tops are blue!


See y'all!


The Mannington/ Revive floor we chose is featured here: Revive Floors

Want to see our kitchen renovation? Read the series!

Kitchen Reno - The Day Before

Kitchen Reno - Day One - Demolition

Kitchen Reno - Day Two

Kitchen Reno - Day Three

Kitchen Reno Week Two Day One - Dry Wall 

Kitchen Reno Week Two Day Two - More Dry Wall 

Kitchen Reno Week Two Day Three - Cabinets 

Kitchen Table Dream 

Kitchen Reno Week Four Tuesday 

Kitchen Reno Week Four Thursday 

Kitchen Pantry - Before and After 


Lee Graybeal Renovate2Day - Graybeal , LLC


Follow Me on Pinterest


Thursday, May 11, 2017

Little Dresser - Grain-Sacked!


painted furniture, Mod Podge, grain sack label, distressed dresser. makeover
Okay, okay, I keep referring to this dresser as having THREE drawers.

I finally noticed after reading comments and emails, there are FOUR drawers.


These dressers are great for beside the bed, by your sofa, blah, blah, blah - you've heard me extol the virtues of these cuties many times before.


Like the brown dresser yesterday, once I sanded it, I decided not to paint it.

Cute Samuel De Champlain grain sacks bags by Tina of What We Keep.


Even though all the back of the house furniture and household possessions are in the den and living room, I still found a space to Mod Podge. 

The old kitchen table.


Image downloaded from the Graphic Marketplace on Etsy (Found here).

A grain sack label.

Offset to allow for the handle.

Remember to get those lines straight.


Larger image on the top.

Followed by two coats of satin craft varnish.


Hope to find yet another small dresser.


The top drawer has a neat organizer built in. 


It can be found at Riverfront Antique Mall in Booth W-10. 


It needs a home.


One last look at the label.


We are surviving the renovations - more posts coming this weekend.


See y'all! 


Want to keep up with our kitchen renovation? Read the series!

Kitchen Reno - The Day Before

Kitchen Reno - Day One - Demolition

Kitchen Reno - Day Two

Kitchen Reno - Day Three  


Due to construction, I will be unable to set up at the annual Magnolia Ridge Antiques and Art Gathering. However, I will definitely be a shopper!  Hope to see you there.


Follow Me on Pinterest


Wednesday, May 10, 2017

French Label Dresser


furniture makeover, Mod Podge, French label, dresser
Time out from the renovations to show off two paint projects involving small dressers.

The first is this brown one with three drawers.

And a French label.


One of you recommended this Etsy shop to find lovely clean and crisp images. 

Go over to Graphic Marketplace (HERE) to find images that are quickly downloaded after payment is received.


I sanded the dresser to paint, but then decided I liked it brown.


Found the perfect image to download and print.

Used Mod Podge to adhere it to the drawers.


The trick to the paper sticking in the milled groove design is to put the Mod Podge on the surface of the wood and not the paper.

I place the paper in the grooves first checking constantly to keep the image level.

Also I let it sit for at least 24 hours before adding a top layer of Mod Podge.


I used a larger image on the top.

Followed with two coats of satin craft varnish.


I offset the images on the drawers so the handle would not completely cover the image.


It quickly sold.

Which made me happy!

Another small dresser tomorrow.


See y'all!


Want to keep up with our kitchen renovation? Read the series!
Kitchen Reno - The Day Before
Kitchen Reno - Day One - Demolition
Kitchen Reno - Day Two 
Kitchen Reno - Day Three 


Due to construction, I will be unable to set up at the annual Magnolia Ridge Antiques and Art Gathering. However, I will definitely be a shopper!  Hope to see you there.


Follow Me on Pinterest