Showing posts with label waxed paper transfers. Show all posts

Sunday, June 26, 2016

Quickies

primitive chest, tool box, quick makeover, image transfer
It is hot as blue blazes here so big paint projects have taken a backseat to small. ones.


Like this primitive tool box.

Now a sedate gray.


Started life as a very distressed box coated in brown paper.

I could not find any markings on the wood or paper.


The hinges no longer attach the lid to the box.

Chewed through in some places by beast or vermin or insect.


After a good sanding. 

It is a hefty guy.


The only paint on it was this gray/green color on the braces of the lid.

I left it as is.


With Bermuda Sand as a base, I added blue and green to make a gray color.


Used a French sheep label from The Graphics Fairy.

Used the waxed paper transfer method.


Did not fill in the holes - too much character.

Did not add new hinges - not necessary.


We can pretend it is an old sheep shearing box.


Since it took less than an hour, I think it qualifies for a quickie.


Still in my junk funk.

But I am shopping Horror Monster, my beloved stash.

Have found things which have not seen the light of day in years.


See y'all!


CLOSED FOR SUMMER!

 Use this discount code to receive 10% off your purchase at the Distressed Donna Etsy store:

DISTRESSEDDONNA16

SHOP HERE! 


Follow Me on Pinterest

 Shabbilicious Friday Party!!

A TRAY OF BLISS: FIVE STAR FROU-FROU #53

Sunday, November 1, 2015

Quickies

quick furniture makeovers
This week's Quickies post is all about furniture make- overs.

All three pieces in 90 minutes.

No kidding!


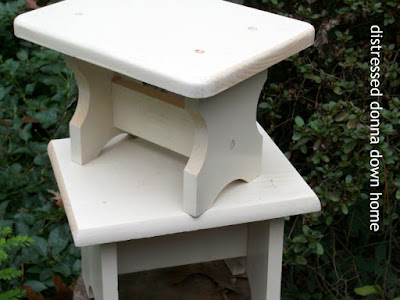
When I saw these two stools last week, I knew what I would do with them.

Do you see three men in a tub or a dead three-legged dog?


A very light coat of Rust-Oleum in Navajo White.

A light sanding with a sanding sponge.


Howard's Citrus Shield in Dark Oak.

If you are picky about your fingernails - use gloves.


An enhanced close-up of  the top of one of the stools.

The grain can be seen through the paint.

Distressing the easy way!


 One stool.


Two stools.

I like the shape of this one the best.

No kidding!


A candlestick table in great shape.

No wobbles!

Needed paint.


Several of the dealers at the antique mall are stocking their booths with white furniture along with whatever they normally have.

So get ready for several white makeovers from me.


Krylon Spray Chalky Finish in Classic White.

A true white.

No undertones.

Bottoms first.


Then the top.


I could not resist adding a bird to the top.

Bird image from The Graphics Fairy.

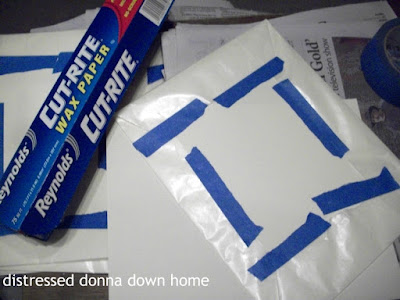
Here's my waxed paper transfer just before flipping.


Taped down tight with one end left untaped so I could check the progress.

I use a brayer first, then use the edge of the roll of tape to burnish the image.


Finished.

BUT ....


The bird was too striated for me.

This can be fixed if you are fast enough and can color in the lines.


I wanted some striations, but not well-defined ones.

I wrapped my index finger with a paper towel and gently began to smudge the ink to create shadows.


You do not wish to go outside the lines.

I added the little cloud in the background.

It may look like bird droppings.

No kidding!


See y'all! 


Use this discount code to receive 10% off your purchase at the Distressed Donna Etsy store:

DISTRESSEDDONNA15

SHOP HERE! 


Follow Me on Pinterest

Show And Share No. 286
Vintage inspiration Party #212
Share Your Cup Thursday #172
Feathered Nest Friday 

ShabFriLogo
 

Let's Talk Vintage Link Party 


Dwellings-The Heart of Your HomeSavvy Southern StyleIvy and Elephants

Thursday, September 17, 2015

Pastries Anyone?


Graphics Fairy image, painted table
Okay, I did not take this photo. 

I do not have any pastries for you.

I do not have many photos of the table I finished.

In fact I could not find any of the before and during photos.


So instead of the photo of the boring brown swivel table and the exciting photo of it being sanded and painted -

I have this photo of a Patisserie - probably not even French - probably American trying to be French

Much like this table.


Here it is - finished.

Most likely a swivel TV stand at one distant time.


Painted Bermuda Sand.


Used the waxed paper method to transfer the Patisserie image from The Graphics Fairy.


 The moody shot.


The plain view shot.


And, yes, I am showing the exact same photo as above since I lost the other photos.

This may be the shortest furniture post in the history of my blog.


See y'all!


Use this discount code to receive 10% off your purchase at the Distressed Donna Etsy store:

DISTRESSEDDONNA15

SHOP HERE! 


Follow Me on Pinterest

Feathered Nest Friday 
Shabbilicious Friday 


Tuesday, March 24, 2015

I've Been Transferred!


The Graphics Fairy, waxed paper transfers, image transfers, signs
"I've been transferred,"  cried the four signs.

Using waxed paper transfers.

Yes, one of the advanced, but still so easy, waxed paper transfer projects.


I was saving this oak table top for the perfect base which I never found before the top split into four pieces.

Oh, well, perfect for signs.

Perfect for transfers!


Cleaned, sanded, and painted with ...

BERMUDA SAND!

Folks, I still have 3/4 of a gallon left so many projects to go with this color.


The links to the tutorials on how to print your transfers are below this post.

Some of you asked if you could print more than one transfer on one sheet of paper.

Yes, you can.


Cut them apart - I leave the paper backing so I can remember which side has the ink on it.


After deciding the placement, you have one chance to get it right so get it right the first time.

You will notice I used a graphic of blue dresses.

Yes, you can print the transfers in color.


Typography is printed in reverse so when you place it, the words are read left to right as normal - the ink is on the back side.


Large blue hydrangeas.


Transferred to a sign board.


Think Monet - the images will not be sharp when you have heavy brush strokes.


A sheet of nine purple hydrangeas.


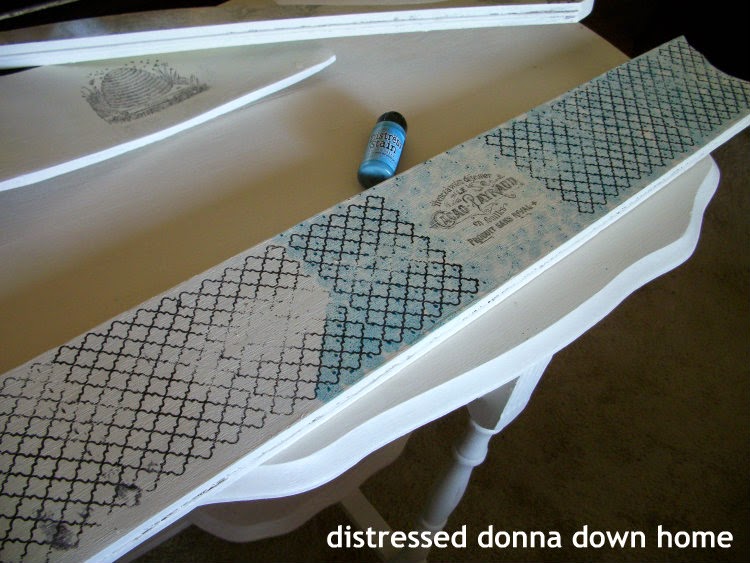
Yes, you can layer the transfers.

Here I transferred the bee image over the purple hydrangeas.


One on each end of the sign.


Stamped the obvious - "BEES" in the middle over the purple hydrangeas.


Stamped this sign with a quatrefoil design in black and used a blue distress ink. 


All designs were sprayed with a matte spray - two coats.

One coat of satin craft varnish was added.


 One sign.


Two signs.


As second look at the second sign.


 Three signs.


A close up because this is my favorite.


Four signs. 


I've been transferred onto four signs.

I am off to do more.

I'll keep you posted.


See y'all!


Interested in transfers?  See these posts:

French Angel
Waxed Paper Transfers

Le Poulet Side Table 
Patisserie Bread Board
Blue Bird On Bermuda Sand


ALL IMAGES ARE FROM THE GRAPHICS FAIRY.  THANKS, KAREN!


Use this discount code to receive 10% off your purchase at the Distressed Donna Etsy store:

DISTRESSEDDONNA15

SHOP HERE! 


Follow Me on Pinterest

Vintage Inspiration Party #182 
Share your Style #6 
Feathered Nest Friday 
Party Junk #272 
Show And Share No.255 


giveaways
 

I'd love for you to join me for my Share Your Cup Thursday Link Party!

Let's Talk Vintage Link Party

Handmade Hangout Linky Party: from g2bSavvy Southern StyleTreasure Hunt Thursday
Dwellings-The Heart of Your HomeFrom Gardners 2 Bergers