Showing posts with label tassels. Show all posts

Sunday, July 27, 2014

To Market, To Market


pink and green market bag. straw tote
To market, to market to buy a fat pig 

-with a cute little market bag in pink and green.


As I was purging my junk one day, I spied several runaway cans of spray paint under the cabinet.

At first I thought I was dreaming.

BUT, NO!


There was a can of Sweet Pea Pink.

I ran around and gathered three baskets, the market bag, and a silverplate tray.


I was so excited about the Sweet Pea Pink paint, I forgot to take before pics.

This was just a generic straw bag with a bright green cloth liner.

After painting it pink, I found this cute fabric scrap.


Wonky colors in the next two photos - have no idea why.

I glued a border of the fabric around the bag and put a button on it.


I decided after the fact that I liked the reverse side of the fabric more than the front.  I glued a tag to the right side so the wrong side showed on the backside of the tag.

Got that?


Front of the tag tied to a giant tassel of the fabric torn into strips.


You knew I would tear something up!


A few fake daisies later and here is my new market bag.


And off to the market I go.

But not to buy a fat pig.

I'll stick to tomatoes.


See y'all!


Swap & Tell Link Up
Every Wednesday Starting August 13!
swap&tell


Use this discount code to receive 10% off your purchase at the Distressed Donna Etsy store:

DISTRESSEDDONNA14

SHOP HERE! 


Follow Me on Pinterest


Share Your Cup Thursday #112
Feathered Nest Friday at French Country Cottage 


Dwellings-The Heart of Your HomeSavvy Southern Style

Monday, July 14, 2014

Prairie Baskets - Plain & Primitive

Distressed baskets, prairie style, primitive baskets
I am still on a mission to spread Prairie - Plain & Primitive as far as I can.

Mount Basket has become higher and higher as I paint, repaint, and paint yet again to achieve the thick distressed finish I am looking for.

When I am not painting baskets, I am overdying calico to tear into ribbons to make rosettes and tassels for the baskets.

Some are listed on Etsy (some of those have vintage linens with them).

Several have made their way to the booth and found new homes.


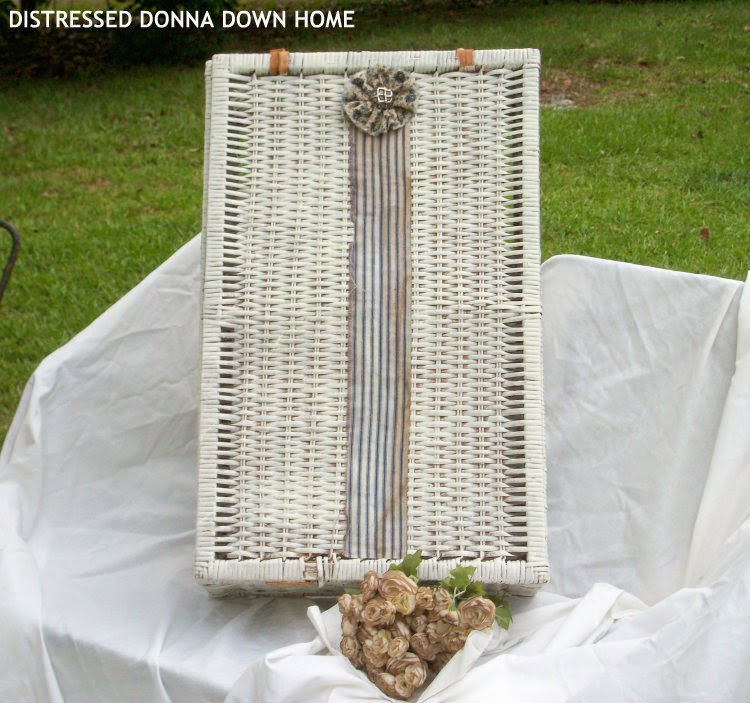
The large lidded basket - perfect to slide on a shelf - distressed white paint - stained ticking with a calico rosette.


A large picnic hamper lightly distressed with stained ticking, calico rosette, and tassel.


I stained this one dark first then painted white.

Added a stained calico piece around the edge with a rosette.


I am in love with this market basket, but have it listed on Etsy.

Heavily, heavily painted with calico ties around the edges.

Added a tassel with a rusty concho.


A wooden basket with twig sides - distressed white paint job.

Mod Podged a striped fabric to the sides.

Rosette of floral upholstery fabric (betcha thought I was going to say calico - HA!) with added pearls.

My distressed roses are getting a work-out being a photo prop.  Read how to create them here.


This one is listed on Etsy.


This is one gigantic twig basket - distressed white with added tassel.

Too huge to ship - in my booth.

It would be great with rolls of vintage linens.


We all got together outside for a Prairie family portrait, but all of the baskets would not fit into the photo.

Here's the first group.


And here's the second group.

So in conclusion, I have been away from Bloglandia painting baskets, making rosettes and dying fabric before tearing it up.

Also I have been glued to the TV watching The World Cup.  I have decided our football players are wimps compared to the soccer guys.  Congrats, Germany - you had to be good to beat us!

I am now on my fourth washcloth for knitting class.  In the fall we will meet again to knit a scarf.

I continue to purge the contents of this house.

My long-held belief that one had to have on hand every craft supply known to exist is ridiculous.

I am now moving into the "buy it and immediately use it up" mode for all craft supplies and paint.  Let the stores worry about where to hide, er, store all that junk.

So if you follow me on Etsy as well as here, be prepared for major destash.

If you are a customer of my booths, be prepare to be inundated with supplies and vintage stuff.  

First up will be the Mount Basket residents.

For those needing a little Prairie - Plain & Primitive Style.

See y'all!


Use this discount code to receive 10% off your purchase at the Distressed Donna Etsy store:

DISTRESSEDDONNA14

SHOP HERE! 


Follow Me on Pinterest


Thrifty Life Thursday at Revisionary Life


Savvy Southern StyleThoughts from AliceDwellings-The Heart of Your Home

Monday, June 9, 2014

Prairie - Plain and Primitive


prairie style, vintage baskets, altered baskets, torn cotton ribbon, ticking
I do not know exactly how time has escaped me, but it has.  I have been caught up with Prairie Style - the book, blogs and magazines.

I cannot get enough of the decorating ideas.

So I jumped in over my head with a pile of baskets to alter into prairie style - plain and primitive.

Here are the first two finished.

More baskets are on the way.


I took two creel-inspired baskets from the 1980's in horrible shape.

The baskets had come unwoven and parts missing.

No problem.

I whitewashed them first.

(Well, I first cleaned them - they were dusty!) 


I took vintage mattress ticking fabric aged with taupe dye and coffee to alter the creels.

I repaired the broken weave in places.

Tied pieces together.

Added a strap of the ticking for a hanger.


Used some vintage buttons.

Made rosettes of distressed torn calico in a blue floral.

Also made a tassel for the front.


A view of the back.


I am happy with the result and have become engrossed with other baskets and how to alter them into prairie style - plain and primitive.


I have made stacks of torn cotton ribbons and rosettes and tassels.


I promise I will be around to check on all of you soon.  I have a pile of emails and comments to answer and I am starting right this very minute.

Well, just as soon as I get this post scheduled to publish.

I also have some goodies from the Peach Tree 23 yard sale to show you.

These first two baskets are listed on Etsy along with two polo tray trophies.

Oh, no, another hour has escaped me!

See y'all!

UPDATE: BOTH OF THESE BASKETS ARE SOLD AS OF 6/14.  MORE ARE BEING LISTED IN OTHER STYLES.


Use this discount code to receive 10% off your purchase at the Distressed Donna Etsy store:

DISTRESSEDDONNA14

SHOP HERE! 


Follow Me on Pinterest

Thriftasaurus #90 at Sir Thrift-A-Lot
Knick Of Time #140 
Share Your Cup Thursday #106 
Thrifty Life Thursday #22 at Revisionary Life 
Feathered Nest Friday at French Country Cottage 
The Cottage Market Presents Junkin Joe Every Friday 
Thrifty Things Friday #5 at Melissa's Antiques 

The BEST of DIY Link Party of the Year 

Vintage Inspiration Party Best Of 2014 


Shabbilicious Friday


A Stroll Thru LifeSavvy Southern Style GREEN wILLOW POND Ivy and ElephantsThoughts from Alice

Sunday, August 11, 2013

From Lard To Lace Tin


From a rustic five gallon lard tin to a pretty container for an overflow of lace, this transformation is complete.

Most of the time to renew the tin was spent waiting for Mod Podge and paint to dry.

She is so decorative, she can be put anywhere and fit right in.


Olive from Olive Out (see her booth here!)  found this lard tin at the Peach Tree 23 Yard Sale Event back in June.  Read A Motley Mix here.

I liked the look, but wanted a more polished finish.


After a thorough cleaning inside and out, the tin received two coats of gesso as a primer.

Wait for the drying time.


Next two coats of Folkart Sea Mist craft paint.

Wait for the drying time.


While waiting I attached a pink porcelain knob to the top.

I anchored the knob with a piece of lath on the underside and a nut so it would not pull through the tin lid.

The screw goes into the knob from this side. 

 Why do most knobs at Hobby Lobby screw the opposite way?  

What do you do with the end piece sticking out into the drawer?

Inquiring minds want to know.


I wanted a label for the front.  Karen at The Graphics Fairy had the perfect one - already colored.

I printed it out on regular paper, full-sized.

Mod Podged it on.

Wait for the drying time.

Two coats of Mod Podge on top.

Wait for the drying time.

Two coats of satin craft varnish.

Wait for the dying time.


I drew an irregular shape in pencil inside the frame.  Filled it in with two coats of chalkboard paint.

I do not mix my own.  I know regular chalkboard paint is expensive, but it lasts a long, long time.

Wait for the drying time.


When you condition the chalkboard paint, make sure to use the side of the chalk.  You do not want to scratch the surface.

Go over it several times.  Then wipe with a soft rag.

Thank goodness, no waiting for drying time!


The lid sports a tassel made from leftover lace scraps, ribbon, and a tag attached to the pink knob.


I stuffed the tin full with lace.


All ready to do duty as a lace tin instead of a lard tin.

Even labeled it "Lace" to remind me what was stored there.


The chicks dig this lacy tassel and give it three stars.

The chicks are from a 100 Proof Press stamp.  (Tweety Birds #5820)  100 Proof Press here!


You would not believe how much lace I stuffed in there.

It looks a lot better than the grocery bags which did hold the lace.

So with many a minute spent waiting for drying time, the transformation from lard tin to lace tin is finally finished.

Time to put it on the shelf.

And if I change my mind about what to store in the tin, all I have to do is erase the label!

OOOH, what about my wooden spool collection?


See y'all!


Follow Me on Pinterest  The Graphics FairyThe DIY Dreamervif187PhotobucketcraftionaryMellywoods Mansion