
 |
The final reveal - Lovely! |
Back in March when I was pulling out spring stuff to decorate the mantel, I took a grapevine tree form, painted it white, wrapped blue chenille ribbon around it, and called it a spring tree. As I was packing away the spring stuff, I thought about turning the tree upside down to make a hanging basket for something. Of course this meant a trip to Hobby Lobby to purchase two more of these grapevine trees because, as you know, everything is better in threes!

Here they are on the painting screens ready for their close-up with the old Rust-Oleum white spray paint. (I did not show the one I already painted - you would have seen that it was actually off-white!)
They are usually used as Christmas trees. Come on, admit it. You have painted at least one gold!
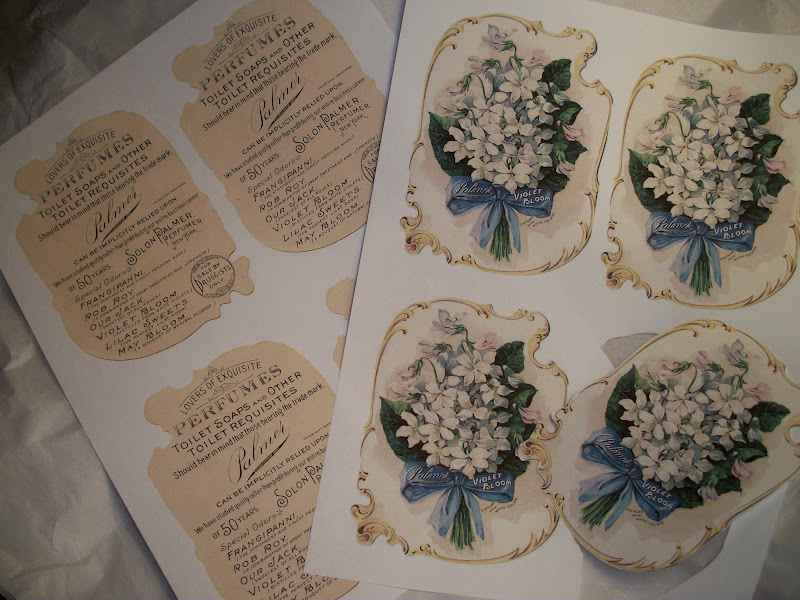
While the paint was drying, I printed out these beautiful Palmer's advertising labels or cards from The Graphics Fairy. I decided on three different florals (only one showing here) and Karen had the advertisement for the back. I cut these out all around the squiggly edges while watching the College World Series. (Plug for the Carolina Gamecocks. Need to win tonight!)

SUPPLIES:
*Three painted cones
*Pink tissue paper - torn into about 4X4" squares
*Images
*Mod Podge
*Foam brush

Now the messy part. I did this outside because it is drippy and sticky. I really glopped the Mod Podge on the back of the tissue paper and slapped it on the grapevine. I took the foam brush and added more Mod Podge to the top making the paper stick in the cracks. You want the torn edges and the holes for a distressed look. Before this could dry, I glopped on Mod Podge to the flower labels and adhered them to the tissue paper. I just eyeballed the placement - center towards the top.
 This is how they looked after drying. Wait I forgot two things. First I put another layer of Mod Podge over these after the first had dried. Second, I decided to save the advertising label for a tag instead of gluing it to the back of the cone.
Really give this step a long time to dry. Have you ever put something on top of the exhaust fan of your outside AC unit - good hot air going to waste! (Don't tell Chucks!)
 |
Here all three await their handles! |

While the drying was happening outside, I got busy making handles for the floral tribute baskets. (Notice the now fancy name for the painted cones!)
First I cut three pieces of small gauge wire for the handles. I did not measure, but made sure to have enough to hang the cone. I brought out my torn muslin ribbons and cut three pieces about 2 1/2 times the length of the wire.
As shown here I sewed through the fabric with the wire down the center. Be careful not to push the cloth off the other end as you are sewing. This will incur extreme rage at one's self! Attach these handles to the cones and fluff the ruffles. If you like a lot of ruffles, just increase the length of the ribbon.

Adhesive cardstock was stuck to the back of the labels to give them more body. I wish I had thought of this before I cut the label out to avoid cutting out all the curlicues around the image twice!
I tied each with pink French seam binding with ivory tulle. The tags were then tied to the handles with a sweet bow.

There is plenty of room inside the cone for a clay pot for a plant - ivy would look nice. Also, a vase for fresh flowers would fit in here. (Or just stuff in some silk flowers and call it a day! Remember to hang where no one can tell they are fake.)

One of these cones for flowers (sorry, folks, I can't think of a clever name for these things tonight!) looked very nice hanging on the halltree in the foyer, but it was too dark to take a decent photo.
The whole day I was working on these cones for flowers (I hate this name - someone please help -send suggestions!), doing laundry, sorting out the recycle, and gathering the trash, the dogs behaved. No running through the house wrestling and barking. No tugging at me wanting to go somewhere. This afternoon I discovered that Scout had been secretly taking the stuffing out of the sofa cushion again. And here is Willie who had worked all day to untie his rope toy and spread its strings all over the dining room!
 |
Willie looks so innocent!Well. I guess I will be sweeping all the strings and stuffing up before the big ball game. Let me go get started.See y'all! |


Well, your doggies made me laugh. How's come they always look so innocent? But I must say I love your flower cones (or whatever) and I am very impressed. I think it is the handle that really makes them beautiful. You did a great job...Connie
ReplyDeleteCall them bugles...like the ones we used to eat and put on our fingers as wicked witch nails. Ha! Cute idea. Way to get crafty.
ReplyDeleteBy the way, please send big girl panties...I don't own any. I'm a wimp. I am still learning to just take junk from the road while looking around to be sure no one is going to shoot me with the scope on their rifle. Usually I just jump out, grab and go, making sure never to make eye contact with anyone and praying they aren't watching out the window. If I don't see them, that means in my mind that they don't see me. I wear a cloak of invisibility when junking. Big girl panties would break my stealth cover. Although, don't think I haven't considered going to someone's door. Hey, wait, actually I did once! But that's a story for another day. Thanks for your funny comment.
Liz
Oh I love your idea! Tree for Christmas and cones for spring! It could also be a nice to hang plants with.
ReplyDeleteYour dog is adorable! I know that look. My dogs does that look all the time :)
Thanks for coming by my blog and it is nice to meet you. I am now your follower :)
xo
Myric
These are lovely and so great to add a pretty touch to the garden or patio. Thanks for your links at Frugal Treasures Tuesday. I will be revealing the completed vanity today, and yes I did add color. -_^
ReplyDelete~Barbe~
Stopping by to say Hello from Three Dawg Lady Designs!
ReplyDeleteSo pretty and a great tutorial. I have a Blog Hop on Wednesdays, and I would love it if you would link this post. You can find it at
ReplyDeletehttp://www.adornedfromabove.com/2012/06/natural-hair-gel-and-wednesdays-adorned.html
It is called Wednesdays Adorned From Above Blog Hop.
I hope to see you there. Have a great Day.
Debi Bolocofsky
Adorned From Above
www.adornedfromabove.com
Your flower cones are lovely and the ruffled handles along with the mod podge pic gives them a distinct look!
ReplyDeleteOh those are cute and it looks like a very doable project! Please link it up http://www.addhousewife.com/2012/06/happy-happy-pininspiration-day-and-were.html
ReplyDeleteThose look great--great idea!
ReplyDeleteThey are lovely! What a great way to reuse those grapevine trees! Love the graphics! Thank you so much for linking this up to Rustic Restorations Weekend!!!
ReplyDeleteWow!! So beautiful! And so unique too. Thanks so much for linking up at I Gotta Create! <3 Christina
ReplyDeleteWell you couldn't be angry at Willies cute face. Great cones!!
ReplyDeleteTanks for linking up at Shabbilicious Friday Donna.
Oooh! I never would've thought to turn them upside down. Definitely going to remember this idea and make one in the fall for my door. Love visualizing you "glopping" on Mod Podge and "slapping" on images~
ReplyDelete