It has been a tool caddy showdown in blogland over the last couple of weeks. I personally have posted two:
I went from blue-gray with bird nests to turquoise named Solomon with a bandana. This time it is a trio of black tool caddies (or toolboxes!)
You know I am moving over to our new/old building at the antique mall and I have not yet gotten around to making autumn stuff. I decided just to add some black, gold, and brown items.
I started with three unfinished toolboxes and lightly sanded them.
I cleaned out the paint cabinet of all the spray cans of black paint. I did not care if it was matte, semi-gloss, satin, or glossy. I just sprayed and sprayed until all the little leftovers were all gone.
Then I sanded the heck out of them!
You can see the distressing better in this photo.
Before I get to the fun part of decorating them, let me show you how I use them around the craft room.
I stack them on their sides! You can just see Laddie on top. The other three are holding twine, ribbons, thread, and all kinds of other goodies. The handles are great for hanging stuff on.
These three would really work well because they are similar in size and the same length.
Try it - you'll like it!!!
First toolbox received a Mod Podged graphic from The Graphics Fairy of antique garden tools.
Very appropriate for a tool caddy!
After it dried I took Tim Holtz Distress Stain in honey and daubed it over the image to stain it.
I let this dry then covered with a coat of Mod Podge. I edged the image with a gold Sharpie paint pen.
I took a risk here. I really should have coated it first before the antiquing!
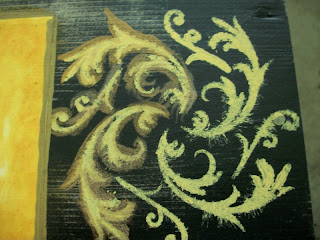
I felt the need to stencil my toolbox with something frilly.
I used spicy mustard craft paint with a soft bristle brush and added a little water to get the fuzzy edges.
Then I went over and around with metallic antique gold craft paint.
You know by now I cannot tell right from left. The after is first; then the before!
Finished product - black and gold with flourishes!
If I ever do get busy with some autumn stuff, this will fit in nicely!
Got to love the flourish so I will show it again!
See Audrey's beautiful toolboxes that gave me inspiration!
See Audrey's beautiful toolboxes that gave me inspiration!
Up close and personal!
I am glad I have a place to sell this stuff or I would have to rent a huge storage facility for all my projects.
Actually that may be a business idea - a storage facility for crafters to work and store their goodies.
We all need a place for our goodies!
Second toolbox was Mod Podged with this graphic of an almanac page from The Graphics Fairy. It was already distressed and I used the harlequin patterned paper behind it.
I decided to stencil a phone number on the backside. (I almost made a tramp stamp joke, but I will let you have a moment to think of your own :>D)
If you are impatient, you can use waxed paper to cover the wet part and get on with the stencil. Just remember to turn over the waxed paper as you move across the piece.
This is spicy mustard again!
I got this one right! The before image is before the after image!
"CALL" has not been highlighted, but the numbers have.
See Solemn Solomon for how to do this with your lettering. Lettering here!
Close up of the completed lettering.
Yes, I see I only put five numbers on it. Until the seventies, we did not need but five. I actually remember just dialing four digits. Yes, dialing, not punching in. We had a party line and you could pick up the receiver to listen to other people's conversations!
This was my phone number in elementary school.
Finished front looking very spiffy in black and tan!
Finished backside with a handy who-to-call telephone number.
I took a manufacturing label from The Graphics Fairy. Karen had already reversed it for us - she is so good about that! So I clipped it in half to use the name on one side and the address on the other.
All three toolboxes were handmade and had quirks. Someone had routed out an area on the bottom of each side of this one.
I painted the area with linen paint, with sage surrounding it, and gold to highlight.
I forgot to say I used the reverse Mod Podge transfer method. I had time so I let the images dry overnight and rubbed the paper off the next day. I did not distress them so they are right clear - sort of different for me!
Here's the name.
I added a stencil of the flourish in sage green to each side. It was highlighted with antique gold.
Here's the address.
I finished off with two coats of a satin varnish for each toolbox.
You saw the front sides up top and here are the backsides - right out in the open for everyone to see. I think I might add some torn cotton ties or some keys to the handles before I put them in the booth. If you have any extra pumpkins, send them over - I could use some!
Party Junk #228 at Funky Junk Interiors
.


Love the toolboxes. I remember only dialing 5 numbers too. My 14 year-old grandson did not know how to use a rotary phone! That's sad!
ReplyDeleteReally nice tool boxes! Laddie has company, but you haven't given them names. I, too, remember the five number phone numbers, but we had a prefix or whatever it was called. I grew up in the area of Ludlow 4-2255 which was in Washington, DC. My girlfriend who retired from AT&T (phone company) still has a working rotary phone in her home.
ReplyDeleteOh my Donna ... what a TRIO. Love all of them and they look so good stacked. You are very talented. Don't know if I could be steady enough to add paint to the stenciled flourish, but it really looks good. Thanks for all the wonderful ideas ... you know I will try them.
ReplyDeleteThanks for giving me credit for inspiring you ... but you have enough inspiration and great decoration ideas for both of us.
Thanks for stopping by Timeless Treasures and leaving such a nice comment.
Blessings,
Audrey Z. @ http://audreyzumwalt.blogspot.com/
Your caddies are awesome, Donna. Great aged look, and design.
ReplyDelete66331. That was mine!
ReplyDeleteNancy
Aren't you on the ball and on the move and talented to boot! I will definitely have to refer to your shadows and shading when I ever get around to lettering. Maybe tomorrow. Of course, maybe tomorrow could go with a lot of things I want to do. Anywho, I could use direction on your reverse mod podge transfer method, if it is what I think it is. But it's late, and I'm recovering from blogger ailments about resizing photos. I will sleep with the thunder, the lightning and the rain nudging in close just outside the windows and try my hand at new techniques ad beating the blogger demons tomorrow.
ReplyDeleteLiz
Girl, do you ever slow down??!! And there you go with your stenciling again! I was particularly interested in the part where you make it fuzzy looking because mine always look like that!! Which reminds me...I need to get an email out to you today! Anyway, these look great!
ReplyDeleteThese are marvelous . . . I am so impressed! Beautiful tool boxes . . . who would have guessed? I hope that you do not mind if I borrow this fabulous idea. I love your step by step photos. You're a sweetie.
ReplyDeleteHave a great weekend, Connie :)
Donna, you want my step stool, I want one of your screen doors. We could swap. Dang... It's too bad screen doors are a trifle awkward to ship.
ReplyDeleteLiz
Wow-these turned out great! I especially love the 'call number'!!
ReplyDeleteSusan
Donna I love your tool caddy...I mean LOVE! Thanks for sharing!
ReplyDeleteThese look awesome! Love the Frenchy one best. ;)
ReplyDeleteI have a tool box I found at a garage sale early in the summer that I still need to get on with doing something to (insert rolling eyes).
Love all three of your tools boxes. I really love the call number one, just cool. How do you keep going and where do you get all of your ideas. All are very pretty! Thanks for sharing your creative inspiration with Sunday’s Best – you helped make the party a success!
ReplyDeleteThose look so cool!! The Paris one is my favorite :-)
ReplyDeleteAgain you've done something amazing with tool boxes - these are just gorgeous Donna!!!
ReplyDeleteHugs,
Suzan